after applying the update above on my OCS R2 Edge server and restart it, I get a strange event in the Office Communications Server log:
Event ID: 12299
Description:The service is shutting down due to an internal error.
Error Code: C3E93C23 (SIPPROXY_E_INVALID_INSTALLATION_DATA)Cause: Check the previous entries in the event log for the failure reason.Resolution:Check the previous event log entries and resolve them. Restart the server. If the problem persists contact Product Support Services.
and the following one as well:
Event ID: 12290
Description:The evaluation period for Microsoft Office Communications Server 2007 R2 has expired. Please upgrade from the evaluation version to the full released version of the product.
---------------------------------------------------------
That was funny! I was sure that I am using licensed copy of the product, so what is the problem.
I found the KB974571, which state clearly the following:
"Services that are required by Communications Server are not started after you install this update and then restart a computer that is running any of the following versions of Communications Server:
Live Communications Server 2005 (LCS)
Live Communications Server 2005 SP1
Office Communications Server 2007 Enterprise edition (OCS)
Office Communications Server 2007 Standard edition
Office Communications Server 2007 R2 Enterprise edition
Office Communications Server 2007 R2 Standard edition
Office Communicator 2007 Evaluation version only*
Office Communicator 2007 R2 Evaluation version only*
Office Communicator 2005 Evaluation version only*"
MS had released a HotFix to resolve this issue.
after running the fix, the service start normally.
Monday, November 9, 2009
Tuesday, September 1, 2009
Certificate issue (Private key not installed)
Recently , I was working on OCS certificate issue. The issue in summary, is that I have requested a certificate for the OCS edge server as well as the Reverse proxy server (ISA 2006), the certificate holds multiple SANs in order to utilize it in both the OCS edge server for the Edge and the web conference roles, and also the Reverse proxy to allow downloading meeting contends and the address list.
Anyway, I have received the certificate, I import it on the ISA server and once I tried to select it on the web listener I get the error: Private Key not installed.
There is a very similar scenario in the exchange team blog ,the missing thing is that I should import the received certificate first on the machine that generate the request to get the private key pairs.
In my case I was requesting the certificate on the Edge server. So, we need to first import the certificate on the edge server to get the certificate working properly with its private key, and then export it to be installed on the ISA server.
So let's go to the edge server
Click the certificate link on the right pane to launch the certificate wizard, click next
Then we have to choose process an offline certificate……
Then browse to the path of the certificate file that has been downloaded from the 3rd party CA, and finish.
Assigning the certificate
Let's access the certificate wizard, but this time we shall choose Assign an existing certificate On the Available Certificate screen choose the imported certificate and click Next
 On the next screen, I shall choose two options
 I choose to assign the certificate for both the access edge and web conference, because I had already requested a certificate with multiple SANs that include them.
And Next then Finish.
Now to export the certificate we should run new MMC, from the file menu choose Add/remove snap-ins
Then add, and choose Certificates, and
make sure to choose computer account, and click Next Then click finish.
From the certificate console, go to the certificate folder under personal, you should find the imported certificate there, right click it and choose export from all tasks. Click Next on the Welcome to the certificate export wizard
Make sure to choose the first option on the next dialog and click Next And ensure to choose enable strong protection and click Next
 On the next window, set a password and click Next.
Then specify a name for the file and location.
And finally finish.
We can use the same way now to import it on the ISA server, from the certificate console we shall right click certificate and choose Import from all tasks Click Next on the welcome screen,
Specify the path of the file on next screen and click Next,
Specify the password for the file and click Next,
Make sure you choose the second option on the Certificate store screen, and click Next And then finish.
Now back to the ISA console, trying to select the imported certificate on the web listener is successful
You can notice that the private key is correctly installed.
Moreover testing the rule is giving successful completion.
To verify access through the Reverse Proxy:
Open a Web browser, type the URLs in the Address bar that are used by clients to access the
Address Book files, Live Meeting content and Distribution Group expansion where
https://externalwebfarmFQDN is the external FQDN of the reverse proxy server.
• For Address Book Server type https://externalWebFarmFQDN/abs/ext User should
receive an HTTP challenge.
• For Web conferencing, type https://externalWebFarmFQDN/conf/ext/Tshoot.html
This URL should display the troubleshooting page for Web conferencing.
• For group expansion type
https://externalWebFarmFQDN/GroupExpansion/ext/service.asmx User should receive an HTTP challenge.
Tuesday, July 28, 2009
How to update Tanjay polycom (1.0.522.34)
Symptoms:
OCS 2007 R2 Enterprise edition deployed over windows 2008, everything is working fine. Updating polycom CX700 device that came with an old version (1.0.522.34) to R2 phone edition fail with no errors!
The IIS 7 log is giving the 200 success entry, which indicates everything is fine.

And the imageupdate log on the OCS server (under Logs\Server\Audit\imageUpdates) is not giving any errors, showing that the device is requesting the correct URL.
In our situation, the device should be updated in two phases. It should be updated first to the Interim version (1.0.522.103), then updated to the latest version which is (3.5.6907.31) at the time of writing this article.
Troubleshooting:
In order to make sure that your device is capable of accessing the new updates, you should be able to browse the internal URL for the updates: http://Pool_FQDN/DeviceUpdateFiles_Int/UCPhone/Polycom/CX700/A/ENU/3.5.6907.31/CPE/CPE.nbt
You should be prompted with a dialog to save the file. In my case I was getting a blank page! , there were no errors and the IIS log is showing the same 200 success entry! ![]()
That was really odd.
While I am trying to figure out this issue I came across the Microsoft Office Communicator 2007 R2 Phone Edition Release Notes which are very useful. I notice that I have some missed WMI settings, those where ExternalUpdatesDownloadURL and ExternalUpdatesStoreURL.
I edited those settings as the MS notes recommended (at the end of the notes), but that does not solve my problem.
I realized that my problem is much related to IIS, in other words, the IIS is not giving the correct information. So I start searching about IIS7 errors on the MS TechNet, I noticed that my IIS is missing some component, that was HTTP Errors (a role service under IIS role).I installed this service.  Then I tried to access the internal URL, and I get the error 500.19….
  This one has been solved clearly by this MS KB942055
After that I do manual restart my polycom cx700 device, and get updated successfully to the interim version then to the (3.5.6907.31) version.
Lack of Documentation:
Well the problem has been sorted out, but! I really wonder if I had missed to install this role service by mistake or because of any other reason.
Back to the MS documentation that has been released for the R2 edition, I had double checked the document OCS 2007 R2 Deploying Enterprise Edition; I foxed on Configuring IIS 7.0 on Windows Server 2008, the requirements there are not including the HTTP Errors feature. It's very obvious that OCS 2007 R2 installation well run smoothly without this feature, but at least adding a Note to the document recommending this feature for troubleshooting purposes will save a lot of time.
For me, I waste a lot of time troubleshooting this issue till sorted out, and I shouldn't if that feature was recommended by the document.
Wednesday, July 30, 2008
Event ID: 1025 on Exchange 2003 SP2

Today morning, I found that the application log on the exchange server is flooded with the following warning:
Event Type: Warning
Event Source: MSExchangeIS Mailbox Store
Event Category: General
Event ID: 1025
Date: 7/30/2008
Time: 8:45:28 AM
User: N/A
Computer: MAIL
Description:
An error occurred on database "DatabaseName".
Function name or description of problem: EcEntryIdFromAddr
Error: 0x467
For more information, click http://www.microsoft.com/contentredirect.asp.
A related article on MS support site stated that this error can occur on exchange 2000, but in our case we have exchange 2003, any way the cause part of the article state the following:
"
CAUSE
This problem can occur if a message from the Internet contains a "REPLY-TO" field. The information store asks for the same attribute (proxy addresses) twice and Dsaccess only fills in the first instance. This problem can occur with Microsoft MSN Hotmail accounts if you alter the reply to address.
"
However to eliminate the error, I have browsed the queue and find out a message pending in the local delivery queue. To sort this error out, I did the following:
- Stop the SMTP service.
- Open the queue directory.
- Open the stucked messages for local delivery with notepad.
- Delete the "REPLY-TO" line.
- Start the SMTP service.
The messages then will be delivered and the error will be eliminated. In my case the messages was coming from a Blackberry device.
Sunday, June 29, 2008
ABCD System Center Essentials (SCE)
In this post I am gonna go through the basic steps to install and configure SCE, and make it up and running.
Initially, once you insert the media it will check for the pre-requisites and give you a nice report whether it is applicable to install SCE or not, and tell you what is the missing components ( .Net framework, IIS…)
I am not going to talk about the installation process since it is as simple as 10 clicks wizard. Once the installation wizard finished, you will get the following screen:

After that, you will launch the SCE console

It is clear that the configuration steps are not completed, mainly we have to configure these three configuration steps in order to make SCE working, and those are:
- Configure product feature: this will configure proxy setting, group policy setting (Domain level or local policy), Firewall Exception, enable remote assistance on client machine, Error collection setting and schedule discovery.
- Configure computers and devices to manage: enable you to discover the network and find out the clients and servers then push the installation of client agent.
- Configure Microsoft Update settings: it is very similar to the WSUS configuration, this will enable you to choose which OS updates to download and which language, and which office and other Microsoft product updates to download, it is easy and a matter of simple click, then you can synchronize with Microsoft site or schedule it on non working hours.
Note: in order to allow the SCE server to discover computers in your network, certain ports must be opened the server VLAN and the clients VLAN, those are:
- TCP (135, 139, 445)
- UDP (137, 138)
If you face problems with installing the agent for any reason, you can manually install the agent by following the steps in this link:
http://technet.microsoft.com/en-us/library/bb437257.aspx
for more information:
http://technet.microsoft.com/en-us/library/cc308579(TechNet.10).aspx
Thursday, April 17, 2008
DNS Disaster Recovery!
If you are working in an organization that hosts its own DNS server where you have the records for MX, Web and other servers that are accessible externally, you must put a plan for how to rebuild your DNS server in case of failure or a disaster.
In this article, I am going to show you how to backup the zones in your DNS server and restore those using DNSCMD command lines; DNSCMD is a part of Support tools. So you must install the support tools in order to run this command.
I am going to simulate the case, by backing up a production DNS server and restore it to a virtual machine image. After installing the support tools on the server go to:
Start -> programs -> windows support tools -> command prompt
The syntax for our command is: dnscmd [ServerName] /zoneexport ZoneName ZoneExportFile
So based on my server and zone names, I will use the following syntax:
C:\>dnscmd MyDNSname /zoneexport TestZone.com TestZone.com.bak
You will notice that the output of this command is:
DNS Server MyDNSname exported zone
TestZone.com to file %windir%\system32\dns\ TestZone.com.bak
DNS server Command completed successfully.
Now you have to browse to the specified path and copy the .bak file, which we will use it to restore the zone to a different server.
- On the new server which supposes to be as a new one, install the DNS service and don't create any new zone.
- Paste the .bak file on %systemroot%\system32\dns and rename the extension to .dns
- Go to DNS management console, right click forward lookup zone and choose new zone, Next, Next, give it the same name, then next, make sure to choose the second choice, it should take the name of the zone automatically.


Now check your zone, it should contain your old records.
Note: In my case, the DNS server is a member server setting on the DMZ zone so the option to have active directory integrated zone is not available. One more thing, the previous exercise is valid in case of corrupted zone or you need to do some modifications on a specific zone, this will get your zone back before the changes.
For more information: http://technet2.microsoft.com/WindowsServer/en/library/d652a163-279f-4047-b3e0-0c468a4d69f31033.mspx?mfr=true
Monday, April 14, 2008
Creating a custom address list
In the previous article we imported a group of contacts from different companies into our AD, the good thing is that those contacts are categorized into OUs based on different company name. I believe we can create a custom address list based on the company names. but first of all we have to change the company name for each contact !
Actually, this is an easy process with ADModify. Just download the tool and extract it. Note: you will need .Net frame work in order to work.
Once you run the tool, click on Modify Attribute, and then you will get this screen:
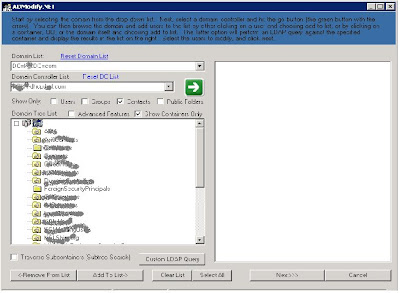
In the Domain List, choose your domain. In the Domain controller List, choose any available DC.
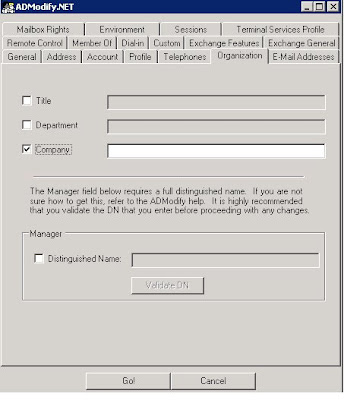
Then click on contacts only, to filter your search. Now click on the green arrow, after that browse to the required OU, once you find it, just click it and click Add to List->, then Select All, and click Next, go to the Organization tab, now we can change the company property for the selected group of contacts in one shot, just check mark company and write the company name, then click Go.
Now let's go to Exchange Management Console to create the customized address list.
Open your EMC, browse to Organization Configuration->Mailbox, right click Mailbox and choose New Address List, give it a name and click the following specific types, then check mark contacts with external e-mail addresses and click next. In the next screen check mark recipient is in a company in Step 1 and click specified in step 2 to fill the company name. To make sure you are filtering the right contacts click preview. Now click next and Next to create the address list immediately.
Now your customized address list has been created and should be accessible to your outlook clients either through MS outlook or OWA.
Enjoy it!
Subscribe to:
Posts (Atom)
